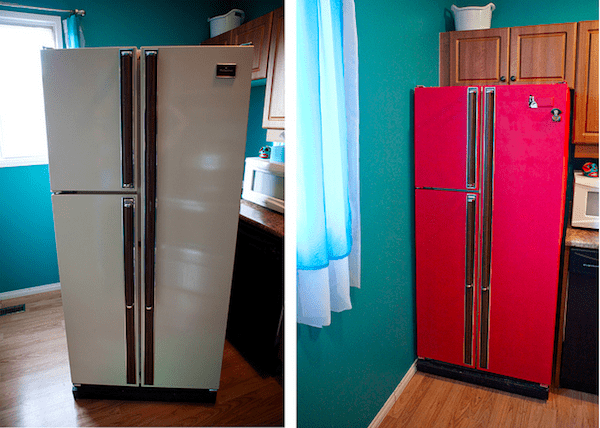
To paint a refrigerator: Move the Refrigerator and Prep the Area Around It, Clean the Exterior of the Refrigerator, Next, Sand It, Cover the Handles & Seals, Now, Apply Primer, and Apply Paint. Below, I will give you specific details.
Why would you not paint your refrigerator? If in good working order, painting a fridge is a quick and simple way to improve its appearance and add color and personality to a space. A fridge can be an expensive item to replace. Despite being such a sizable, prominent piece, people frequently forget about them when selecting painting projects.
DIY enthusiasts all over the world are picking up a paintbrush to update the standard appliance to fit their style, including hand-painted fridges that resemble wallpaper and matte black-and-gold makeovers. As a result of their shape, painting offers practically limitless possibilities.
How to Paint a Refrigerator?
Move the Refrigerator and Prep the Area Around It
Getting the fridge ready requires careful preparation and patience before you can begin painting. That entails moving it away from the wall and any other appliances and pieces of furniture. Additionally, you must remove the food from the refrigerator and freezer. Unplug the fridge.
Because all types of paint emit toxic fumes, it would be ideal to move it to a space that has good ventilation. It is also simple to clean up after using the refrigerator outside or on a deck. Make sure to cover the floor and any surfaces near the refrigerator if you plan to paint it inside.
Clean the Exterior of the Refrigerator
This step is crucial because any dirt or stains will leave a trace and become even more noticeable after you’ve painted over them. Start cleaning the refrigerator with warm water and soap after placing a drop cloth around it or underneath it. Ensure that you also clean the corners and edges. Don’t use a towel or anything else to dry the refrigerator after that because that will leave lint behind and damage the paint. Instead, allow it to dry naturally.
Next, Sand It
You can start removing the gloss once your refrigerator is thoroughly clean. The surface that you want to be painted after using sandpaper (medium grit) should be carefully gone over. If you want the new paint to look good and last, you must go through this process in order to improve the paint’s adhesion.
Removing the current paint is not necessary. Only the glossy finish should be removed. When you’re finished, wipe it down with a damp cloth to remove any dust.
Cover the Handles & Seals
The next step is to cover any areas that you don’t want painted with painter’s tape. This covers any displays, hinges, seals, handles, and other components your refrigerator might have. During the painting process, make sure the tape is firmly in place and does not easily come off. Of course, it would be ideal if you could do away with the handles entirely to make painting the refrigerator simpler and achieve a smooth appearance.
Now, Apply Primer
Applying a two-in-one paint that includes primer in its formula can sometimes be used in place of this step. But whether it’s a separate step or not, primer is always required because it makes the paint stick to the fridge and make it look even and smooth. I
f you opt for the separate primer strategy, apply a coat, let it dry, then go over the surface with steel wool to get rid of any bumps and speckles. Apply a second coat of primer after washing and allowing the refrigerator to dry.
Apply Paint
You basically have two choices at this point: roller or spray paint. The approach varies depending on the situation. Open the paint can, give it a stir, and then pour some into a tray if using a roller. Then, using a foam roller dipped in paint, apply a coat of paint to the entire refrigerator, let it dry, then repeat, let it dry, and add a third coat. You’ll also need a thin brush, which you’ll use to paint the edges, corners, and other difficult-to-reach areas that the roller can’t reach.
Be sure to shake the can of spray paint before using it. If you don’t read the labels and shake the can as directed, the paint may not be the color you want or may not have the consistency you want. Then proceed to apply several light coats, letting each one dry in between and erasing any lumps or specks that you may have noticed.
For at least 24 hours, let the paint dry. Don’t forget to paint the fridge’s interior frame as well. If you choose to use a roller rather than spray paint, the same rules still apply.
Suggested reading: One of the best ways to quickly improve the appearance and ambiance of a space where you probably spend a lot of time is by updating your kitchen cabinets. So, how much does it cost to paint kitchen cabinets?

Paint a Refrigerator Or Freezer – Additional Tips for a Quality Finish…
- I neglected to tape anything off before priming and painting the freezer, including the plastic door seal. I painted right over that white plastic seal because I wanted to paint my freezer a dark color and didn’t want the white plastic seal to show. Just to act as its own taped off area, I made sure to keep the freezer door closed the entire time I was painting. The plastic seal’s exterior (or “outer”) regions (i.e., the parts that show when the doors is closed) are now painted, but the inside parts are still white, and they still seal to the original factory finish.
- The grill beneath the door was removed so that I could paint it. Two screws held it in place, which I was able to remove with ease. I then sprayed it with the Critter. In this manner, I could apply a high-quality finish without painting the freezer’s motor or other mechanical components.
- The use of a clear topcoat is something I’m still debating. If I do, I’ll use a topcoat from General Finishes because it’s my favorite. It’s so much better than Minwax Polycrylic that they aren’t even comparable, and it also outperforms every Rust-Oleum water-based clear coat I’ve ever used. I used General Finishes Topcoat to paint my kitchen cabinets, and I’m astonished at how long it lasts and how simple it is to keep clean. While a plain, unprotected latex paint finish is less long-lasting, it is much simpler to repair. It will only take me two minutes to fix any chips or scratches before I move on. Touching up a scratch or chip is significantly more difficult with a protective topcoat. So for the time being, I’ll just put up with the painted surface as is and see if I end up preferring the additional protection provided by a clear topcoat.
- It’s true that I used a towel bar as the handle. Simply measuring the space between the old handle posts and using that measurement to find a new handle allowed me to find the correct size. I was aware that I would be taking out the original posts, but I also knew that doing so would leave holes that would either need to be filled with Bondo or concealed by the new handle. Since my freezer has a textured surface and I didn’t want to mess with Bondo, I simply made sure to purchase a handle that would cover the holes.
FAQs
What Kind of Paint Can Be Used on a Fridge?
Make sure to use paint that can be applied to metal surfaces. You can get what you need at hardware stores. Always read the item description before making an online purchase.
Appliance epoxy is great for touching up in white. Water-based, latex-based, and oil-based paints can be used as long as they mention that they’re for metal. Several spray paint options work well on metal – rust-oleum being one of the best-known brands that I can think of.
Chalkboard paint is another option that can be great for a simple Retro refrigerator design and DIY refrigerator project.
Do You Need to Seal the Paint?
No, it’s not absolutely essential. However, it will further shield the paint from scuffing off and general deterioration. Additionally, spray enamel sealant can stop the fridge from rusting.
Do You Need to Sand the Refrigerator before Painting?
Sanding the refrigerator could help to ensure a longer-lasting finish and a smoother base for the primer. I chose to forego this step, though, and I’ll let you know how it holds up over time. However, for the time being, the paint looks perfect and applied flawlessly, so I believe the choice is ultimately yours. Your refrigerator’s finish—whether it is smooth or not—also affects this.
If you do decide to sand the refrigerator, make sure to clean it first, then sand it, clean it again (to get rid of any fresh dust), and paint it with primer.
Will Painting the Refrigerator Affect the Magnetism?
You can always use a magnetic primer before painting the fridge to make sure that this won’t happen. I’m not 100% certain, but this might be more important with different paints, like chalkboard paint.
Read about


